Nail Gun Safety Tips for Beginners: Your Complete Guide
Picture this: You’re excited to start your first DIY project, nail gun in hand, ready to tackle that deck repair. Then suddenly—bang—a nail ricochets off a knot in the wood, missing your eye by inches. Sound terrifying? It should.
Nail guns send an estimated 37,000 people to emergency rooms each year, with 2 out of 5 residential carpenter apprentices experiencing nail gun injuries during their training period. But here’s the good news: every single one of these accidents is preventable when you know what you’re doing.
As someone who’s spent over 15 years training new woodworkers and DIY enthusiasts, I’ve seen firsthand how proper safety knowledge transforms nervous beginners into confident, skilled users. In this comprehensive guide, you’ll learn the essential nail gun safety tips that will keep you injury-free while maximizing your project efficiency.
Quick Safety Overview: 5 Critical Rules Every Beginner Must Know
Before we dive deep, here are the non-negotiables that can save your fingers, eyes, and sanity:
• Never bypass safety mechanisms – those triggers and guards are there for a reason • Always wear protective gear – safety glasses and hearing protection are mandatory, not optional
• Keep your finger off the trigger when not actively nailing • Maintain proper positioning – 90-degree angle to the surface, never at an awkward angle • Inspect your tool before every use – a 30-second check can prevent hours of pain
Remember: Confidence comes from knowledge, and knowledge comes from understanding both the tool and the risks.
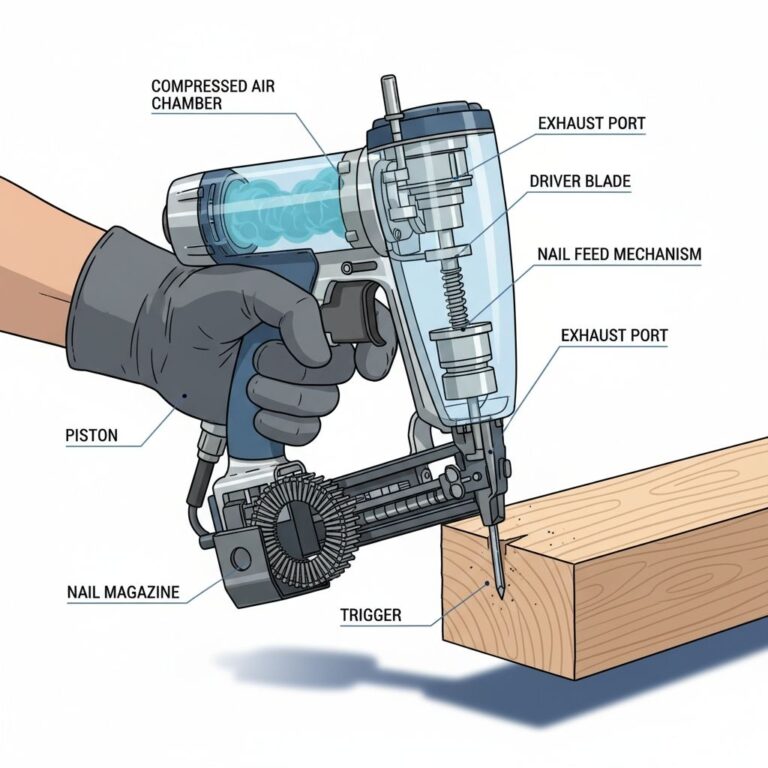
Understanding Your Nail Gun: The Foundation of Safe Operation
Know Your Trigger System (Beginner Level)
Here’s what separates safe operators from accident statistics: understanding exactly how your nail gun fires. There are two main trigger systems, and knowing the difference could literally save your limbs.
Sequential Trigger (Contact Trip): The safety tip must contact the work surface before you can pull the trigger. This is the safer option for beginners because it requires two deliberate actions.
Bump Fire (Dual Action): Pull the trigger first, then press against the surface to fire. While faster for production work, it’s more dangerous because maintaining trigger pressure while moving the gun can lead to accidental discharge.
Pro Tip: If you’re new to nail guns, start with a sequential trigger model. Yes, it’s slightly slower, but the reduced injury risk is worth the trade-off while you build proper habits.
Real-World Example: I once worked with a contractor who switched his entire crew to sequential triggers after a new hire accidentally shot a nail through his boot using a bump-fire gun. The “slower” sequential trigger actually increased their overall productivity because they eliminated costly accidents and delays.
The Pre-Use Safety Ritual: Your 30-Second Insurance Policy
Daily Inspection Checklist (All Levels)
Every professional I know follows this exact routine before touching a nail gun. It takes less than 30 seconds but prevents 90% of mechanical failures that cause injuries.
Step 1: Visual Inspection (10 seconds)
- Check air hose for cracks, kinks, or damage
- Verify safety mechanisms aren’t damaged or modified
- Look for loose screws or worn components
- Ensure nail magazine is properly seated
Step 2: Function Test (15 seconds)
- Test trigger without nails loaded
- Check that safety tip retracts smoothly
- Verify proper air pressure (typically 70-120 PSI)
- Test depth adjustment dial
Step 3: Load Test (5 seconds)
- Load a few nails and test fire into scrap wood
- Listen for unusual sounds or irregular firing
- Check nail penetration depth
Troubleshooting Alert: If your nail gun double-fires, misfires, or makes unusual noises during testing, stop immediately. These are warning signs of internal damage that can lead to dangerous malfunctions.
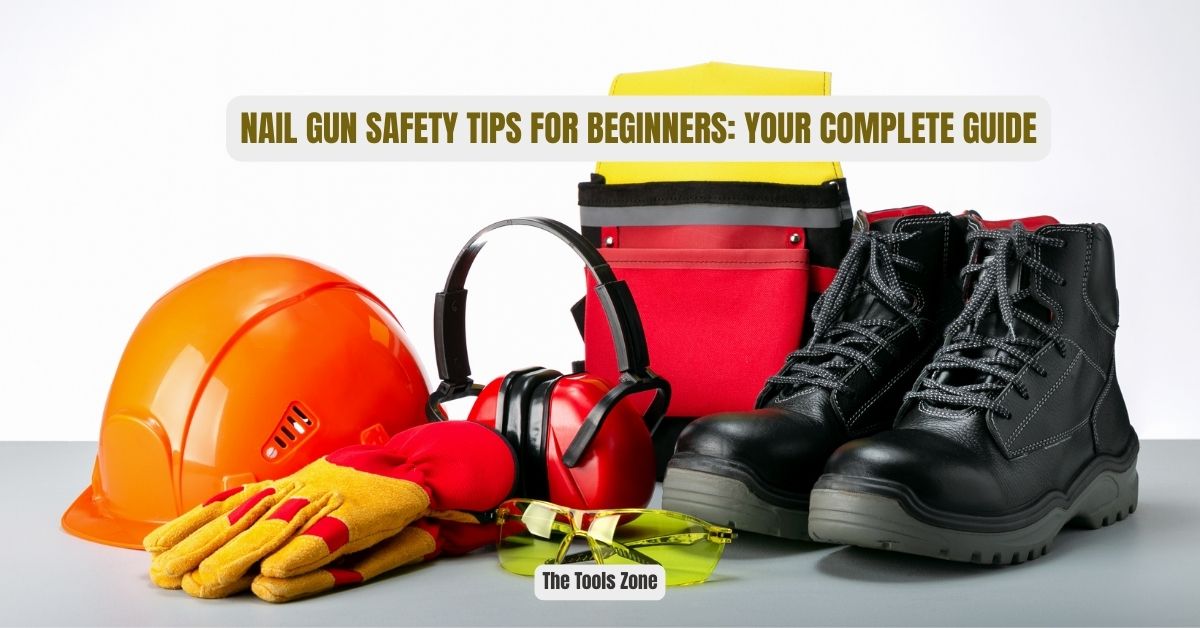
Personal Protective Equipment: Your Last Line of Defense
The Essential Safety Gear (Beginner Level)
I’ve seen too many “experienced” users skip PPE because they’re “just doing a quick job.” Don’t be that person. Here’s your non-negotiable safety gear:
Safety Glasses (ANSI Z87.1 rated)
- Why it matters: Flying nail fragments and wood debris are the #1 cause of nail gun-related eye injuries
- What to buy: Wraparound style with side shields, impact-resistant polycarbonate lenses
- Pro insight: Prescription glasses don’t count—you need dedicated safety glasses that meet industrial standards
Hearing Protection
- Why it matters: Repeated nail gun use causes cumulative hearing damage
- Decibel reality: Nail guns produce 90-110 decibels—equivalent to a motorcycle engine
- Options: Foam earplugs (NRR 25-30) or noise-canceling ear muffs for extended use
Work Gloves (Cut-resistant)
- Why it matters: Improves grip and protects from splinters and sharp nail edges
- What to avoid: Thick gloves that reduce trigger sensitivity
- Sweet spot: Thin, cut-resistant gloves that maintain dexterity
Steel-Toed Boots
- Reality check: Hand and knee injuries account for 66.7% of nail gun accidents, but foot injuries are often the most severe
- When it’s critical: Any overhead work or working on scaffolding
Proper Handling Techniques: Moving Beyond Basic Safety
The Right Way to Hold and Position Your Nail Gun (Intermediate Level)
Most beginners focus on where to aim, but how you hold the gun determines both accuracy and safety.
The Professional Grip:
- Dominant hand: Firm grip on handle, index finger rests alongside trigger guard (not on trigger)
- Support hand: Lightly guides the nose, never wraps around the front
- Body position: Stand with feet shoulder-width apart, tool at comfortable working height
- Angle: Always maintain 90-degree contact with work surface
Movement Rules:
- Never carry by the air hose – this damages connections and creates tripping hazards
- Keep both hands on the tool when moving between nailing locations
- Set the gun down rather than tucking it under your arm or holding it casually
Pro Tip: Practice your grip and positioning with an unloaded gun first. Muscle memory developed during safe practice prevents dangerous mistakes under pressure.
Common Mistake: Many beginners try to “aim” like a gun. Instead, think of it as a precise placement tool—the accuracy comes from proper contact, not sight alignment.
Work Surface Preparation: The Foundation of Safe Nailing
Material Assessment and Preparation (Intermediate Level)
The work surface plays a huge role in nail gun safety. Here’s what professionals check before the first nail:
Material Hardness Check:
- Softwood (pine, cedar): Standard settings, watch for over-penetration
- Hardwood (oak, maple): Increase pressure, pre-drill if necessary
- Engineered materials: Check manufacturer recommendations—some require special nails
Hidden Hazard Detection:
- Electrical wires: Use a stud finder with wire detection
- Plumbing: Know your building’s layout, especially in walls
- Metal fasteners: Old screws or nails can cause dangerous ricochets
Surface Stability:
- Secure all materials before nailing—movement during firing is extremely dangerous
- Check for knots and defects that can deflect nails unpredictably
- Ensure adequate backing to prevent nail blow-through
Real-World Story: A DIYer I knew was installing trim and hit an electrical wire because he didn’t check for hidden hazards. The nail punctured the wire, causing a short that tripped the breaker and could have been much worse. A $15 wire detector would have prevented this entirely.
Advanced Safety Techniques: What the Pros Know
Managing Air Pressure and Nail Selection (Advanced Level)
This is where beginners often get into trouble—they assume one setting works for everything.
Pressure Optimization:
- Start low: Begin at 70 PSI and increase gradually
- Test methodology: Fire 3-5 test nails into scrap material
- Perfect setting: Nail head sits flush without over-driving or under-driving
- Seasonal adjustment: Cold weather requires slight pressure increases
Nail Selection Science:
- Length rule: Nail should penetrate 1.5x the thickness of the material you’re attaching
- Gauge matters: Thicker nails for structural work, thinner for finish work
- Head types: Different projects require different head styles (clipped, full round, etc.)
Pro Insight: Many injuries occur when people try to “force” the wrong nail/pressure combination. If you’re getting blowouts, ricochets, or poor penetration, adjust your setup—don’t muscle through it.
Emergency Procedures: When Things Go Wrong
Immediate Response to Nail Gun Accidents (Critical Knowledge)
Even with perfect safety practices, accidents can happen. Here’s your emergency action plan:
If Someone Gets Shot with a Nail:
- DO NOT remove the nail if it’s deeply embedded
- Control bleeding around the entry point
- Call 911 immediately for any nail penetration beyond skin deep
- Keep the person calm and still to prevent further tissue damage
- Document everything for medical personnel and insurance
Equipment Malfunction Response:
- Disconnect air supply immediately
- Point the tool away from all people
- Do not attempt field repairs on safety mechanisms
- Tag the tool as defective to prevent others from using it
Medical Reality: About 25% of nail gun injuries cause workers to miss more than two weeks of work, and 14% result in more than a month off the job. Even “minor” nail punctures can cause serious infections or nerve damage.
Common Mistakes That Lead to Accidents
The “Experienced User” Trap (All Levels)
These are the mistakes I see most often—even from people who’ve used nail guns for years:
Mistake #1: Finger on the Trigger
- Why it happens: Feels natural, like holding any tool
- The danger: 12% of nail gun injuries happen to workers not even using the tool
- Solution: Practice carrying with finger alongside trigger guard until it becomes automatic
Mistake #2: Modified Safety Features
- Why people do it: Thinking they can work faster
- The reality: Bypass injuries are almost always more severe than normal accidents
- Professional standard: OSHA requires tools be maintained in safe condition—modifications violate safety regulations
Mistake #3: Poor Body Positioning
- Common error: Reaching or working at awkward angles
- Injury pattern: Loss of control leads to nails in legs, feet, or hands
- Solution: Move your body, not just your arms—maintain stable, balanced stance
Mistake #4: Inadequate Air Hose Management
- The problem: Tripping hazards and hose damage
- Safety impact: Damaged hoses can cause pressure fluctuations and unpredictable firing
- Professional practice: Coil excess hose neatly, route away from walking paths
Mistake #5: Ignoring Manufacturer Guidelines
- Why it’s dangerous: Each tool has specific requirements for nails, pressure, and maintenance
- Reality check: Using the wrong nails can cause jams, misfires, or dangerous ricochets
- Best practice: Keep manufacturer’s manual accessible and refer to it regularly
Tools and Materials for Safe Operation
Essential Accessories for Every Nail Gun User (All Levels)
Beyond the nail gun itself, these accessories are critical for safe operation:
Maintenance Kit:
- Allen wrenches (for depth adjustment)
- Cleaning oil (manufacturer-specified only)
- Replacement O-rings and seals
- Small wire brush for clearing debris
Safety Equipment:
- First aid kit with wound-sealing bandages
- Emergency contact list (local hospital, poison control)
- Fire extinguisher (for compressed air accidents)
- Lockout/tagout tags for defective equipment
Air System Components:
- In-line filter (removes moisture and debris)
- Pressure regulator with gauge (accurate pressure control)
- Quick-connect fittings (prevent air leaks)
- Hose reel or management system
Budget Reality: Investing in quality safety accessories costs less than a single emergency room visit. Don’t compromise on safety to save a few dollars.
Maintenance: Keeping Your Tool Safe and Reliable
The Professional Maintenance Schedule (Intermediate Level)
Proper maintenance isn’t just about tool longevity—it’s about safety. A poorly maintained nail gun is an accident waiting to happen.
Daily (After Each Use):
- Disconnect air supply and empty nail magazine
- Wipe down exterior with clean cloth
- Check for loose screws or damaged components
- Store in dry location with trigger locked or tool secured
Weekly (Heavy Use) or Monthly (Occasional Use):
- Remove and clean nail magazine
- Lubricate according to manufacturer specifications
- Check air hose connections for leaks
- Test all safety mechanisms
Seasonally:
- Professional service for internal components
- Replace worn seals and O-rings
- Calibrate pressure settings
- Update safety training knowledge
Maintenance Red Flags: If your nail gun starts double-firing, misfiring, leaking air, or making unusual noises, stop using it immediately. These symptoms indicate internal problems that can cause dangerous malfunctions.
Frequently Asked Questions
Q1: What’s the most important safety rule for nail gun beginners?
Never keep your finger on the trigger when not actively nailing. This single habit prevents the majority of accidental discharges. Practice carrying and positioning the gun with your finger alongside the trigger guard until it becomes automatic.
Q2: Can I use any type of nail in my nail gun?
Absolutely not. Each nail gun is designed for specific nail types, lengths, and gauges. Using the wrong nails can cause jams, misfires, or dangerous ricochets. Always consult your owner’s manual and use only manufacturer-recommended fasteners.
Q3: How do I know if my air pressure is set correctly?
Start at 70 PSI and test on scrap material. The correct pressure drives the nail flush with the surface without over-penetration. If nails aren’t seating properly, increase pressure in small increments (5-10 PSI) rather than making large adjustments.
Q4: Is it safe to remove a jammed nail myself?
Only if you follow proper procedures. First, disconnect the air supply completely. Then, follow your manufacturer’s specific jam-clearing instructions. Never try to clear jams while the tool is connected to air pressure, and never use excessive force that could damage safety mechanisms.
Q5: What should I do if someone gets injured by a nail gun?
Call 911 immediately for any nail penetration beyond skin deep. Do not remove deeply embedded nails, as they may be preventing severe bleeding. Control bleeding around the entry point and keep the injured person calm and still until medical help arrives.
Q6: Can I modify my nail gun to work faster?
Never modify safety features. Beyond being extremely dangerous, modifying safety mechanisms violates OSHA regulations and manufacturer warranties. Professional contractors achieve speed through proper technique and experience, not by bypassing safety systems.
Q7: How often should I have my nail gun professionally serviced?
At least annually for regular users, or whenever you notice performance issues. Professional service includes internal cleaning, seal replacement, and safety system verification that you can’t perform yourself. This investment prevents both accidents and costly breakdowns.
Key Takeaways: Your Safety Success Summary
Congratulations—you now have the knowledge that separates safe, confident nail gun users from accident statistics. Let’s recap the critical points that will keep you injury-free:
Your Daily Safety Habits:
- Complete the 30-second inspection ritual before every use
- Keep your finger off the trigger except when actively firing
- Maintain 90-degree contact with work surfaces
- Wear proper PPE every time, no exceptions
Your Setup Standards:
- Use only manufacturer-recommended nails and pressure settings
- Inspect work surfaces for hidden hazards before starting
- Secure all materials and maintain proper body positioning
- Keep your workspace organized with proper air hose management
Your Professional Mindset:
- Respect the tool’s power—nail guns aren’t toys or casual tools
- Invest in quality safety equipment and maintenance
- Stay educated on best practices and safety updates
- Never compromise safety for speed or convenience
Remember, every professional was once a beginner who made the choice to prioritize safety over shortcuts. The habits you develop now will serve you for decades of successful, injury-free projects.
Take Action: Start Your Safe Nail Gun Journey Today
You’re now equipped with professional-level safety knowledge, but knowledge only helps when it’s applied. Here’s your next step:
Before your next project: Practice these safety techniques with an unloaded nail gun. Build the muscle memory for proper grip, positioning, and handling. The 10 minutes you spend practicing safe habits now could prevent a lifetime of regret.
Share your experience: Have you had a close call or learned a valuable safety lesson with nail guns? Share your story in the comments below—your experience could prevent someone else’s accident.
Stay connected: Want more power tool safety guides and project tips? Subscribe to our newsletter for expert advice delivered directly to your inbox, plus access to our exclusive safety checklist downloads.
Your safety is worth more than any project deadline. Make smart choices, and happy building!
=