How to Use a Router Table: Setup, Fence, and Safe Feed Tips
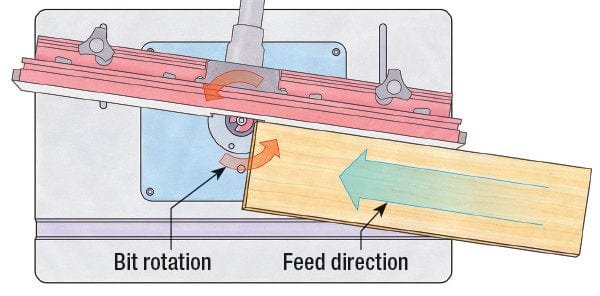
You can set up a router table by mounting your router to the base plate, aligning the fence parallel to the bit, and adjusting the feed direction so that the wood moves against the rotation of the cutter. To use a router table safely and effectively, you must always maintain a firm grip on the workpiece and keep your hands clear of the spinning bit. This method works best for woodworkers who want to create consistent edges, joints, or decorative profiles on small to medium-sized stock.
Preparing Your Router Table and Fence
To get started, you need a collection of tools that ensure both precision and safety during your milling tasks. Having the right equipment prevents common errors like burning the wood or losing control of the workpiece.
- Router table: A flat, stable surface with a mounting plate designed for your specific router model.
- Fixed-base router: A motor that attaches securely to the plate from underneath.
- Router bits: Carbide-tipped cutters matched to the profile you want to achieve.
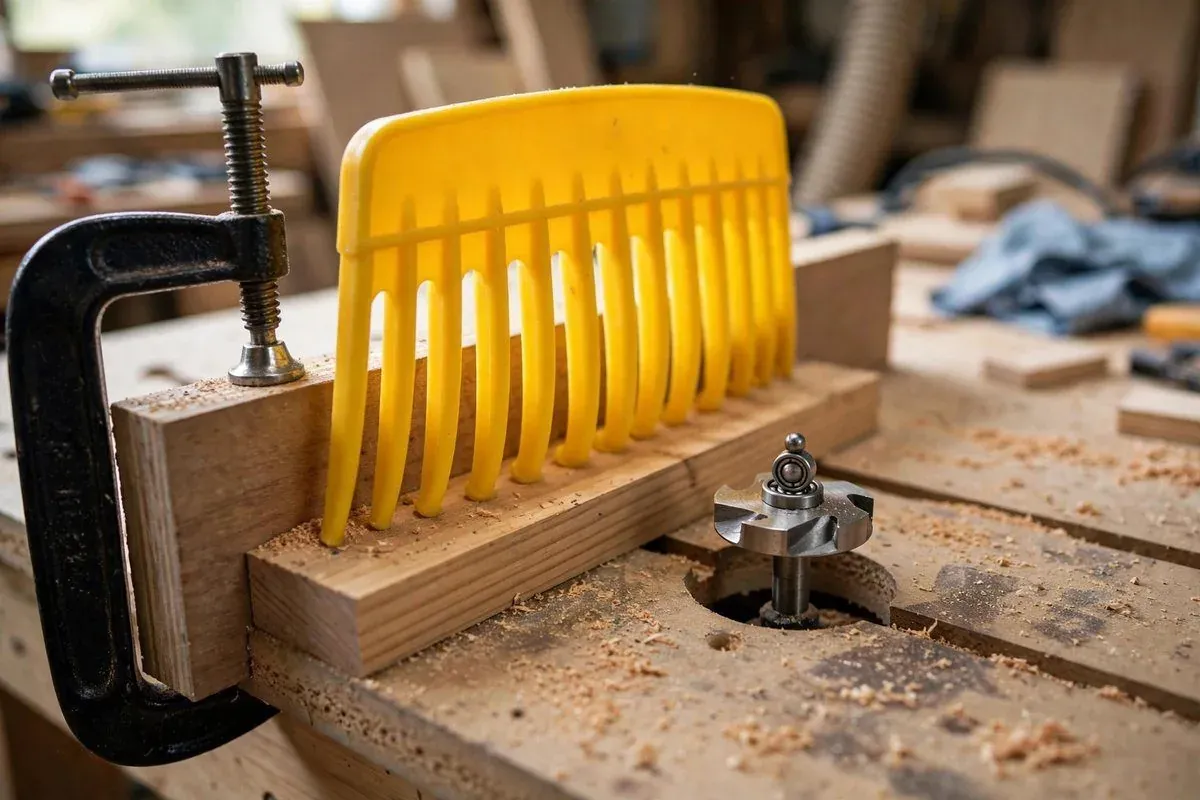
- Push sticks and featherboards: Tools to keep your hands away from the bit and hold the stock tight against the fence.
- Safety glasses: Protective eyewear that meets ANSI Z87.1 standards to shield you from flying debris.
- Hearing protection: Earmuffs or plugs to block the high-frequency noise of the router motor.
If you’re missing a featherboard, you can use a shop-made wooden spring instead, but never attempt to feed wood without any downward or lateral pressure. If your router didn’t come with an adjustable base, you may need a separate mounting plate kit that fits your specific brand. Check your router manual to confirm which plate inserts are compatible with your motor housing.
Steps for Milling Wood Safely
- Install the router into the mounting plate, ensuring it’s perfectly flush with the table surface to avoid catching the wood.
- Attach the fence and align it so it’s perfectly parallel to the miter slot or the edge of the table.
- Adjust the bit height to your desired depth, making sure the power is disconnected while you work near the cutter.
- Position the featherboards to press the stock firmly against the fence and the table surface, which prevents the wood from lifting.
- Set the feed direction by moving the wood from right to left, which is against the clockwise rotation of the bit.
- Feed the wood steadily into the bit, maintaining a constant speed to prevent burning the material with friction.
- Use push sticks for the final few inches of the cut, ensuring your fingers never pass within 4 inches of the spinning bit.
Careful: Never feed the wood in the same direction as the bit rotation, as this causes the router to “climb” and pull the wood out of your hands. Tip: Always perform a test cut on a scrap piece of the same wood species to check your height and fence settings before working on your final project.
Situational Adjustments and Timing
The effort required changes based on the size of the wood and the depth of the cut you’re making. Start with light passes to keep the motor from stalling or overheating.
| Situation | Time/Effort | What is Different | Watch For |
|---|---|---|---|
| Softwood edges | Low | Less resistance | Grain tear-out |
| Hardwood profiling | Medium | Slower feed rate | Bit burning |
| Deep grooves | High | Multiple passes | Motor strain |
| Narrow stock | High | Needs extra support | Tip-over risk |
It’s always safer to remove material in two or three shallow passes rather than trying to achieve the full depth in one go. Overreaching on the first try often leads to chatter marks on the wood or damage to the bit.
Judging Your Results
A good cut is smooth to the touch and shows no burn marks or “chatter” vibrations. If you see dark, brown streaks on the wood, you’re moving the stock too slowly, which allows the spinning bit to overheat the surface. This happens because the bit is rubbing against the wood instead of slicing through it cleanly.
To prevent this, increase your feed speed slightly or reduce the amount of material you’re removing in a single pass. If the wood feels fuzzy or exhibits torn grain, your bit is likely dull. A sharp blade shears fibers cleanly, while a dull one pulls them apart.
When you encounter chatter marks, check your collet tightness first. Even a microscopic slip causes the bit to vibrate, creating a rhythmic, wavy pattern. If the collet is secure, reduce your depth of cut by half.
Safety Rules and Maintenance
Always unplug the router before changing bits or adjusting the fence to prevent accidental activation. After you finish your work, use a vacuum to clear all sawdust from the table and the router collet, as buildup can cause the motor to overheat or the bit to slip.
Store your router bits in a wooden case to prevent the carbide edges from chipping against each other. If you ever notice the router motor vibrating excessively, stop immediately and check that the collet nut is tightened correctly and the bit is seated fully.
Alternative Routing Methods

Handheld Routing
You move the router over the wood instead of the wood over the router. This is better for large panels or tabletops that are too heavy to balance on a table. It requires more focus on guiding the tool straight, which can be harder for beginners to master.
Shaper Tables
These are industrial-grade versions of a router table designed for heavy-duty production work. They use larger knives and have much higher power, which allows for deeper cuts in a single pass. These are generally not needed for small home projects and carry higher injury risks.
CNC Routing
Computer-controlled routers automate the entire movement process based on a digital file. This removes the need for manual feeding and ensures perfect repeatability for complex shapes. It’s the most expensive route and requires learning specialized design software before you can start cutting any wood at all.
Related guides
- How to Use an Impact Driver: Setup and Safe Technique Guide
- Best Screw Gun for Decking: Top Auto-Feed Tools for Fastening Efficiency
Frequently asked questions
Can I use a regular circular saw as a router?
No, a circular saw can’t function as a router. The motor speed and the way the blade attaches are designed for straight cuts, not for holding the high-speed bits required for routing. Using the wrong tool can cause the bit to fly out, leading to severe injury.
How long does it take to set up a router table?
It takes about 15 to 30 minutes to set up a router table, depending on how many adjustments you need for your fence and bit height. If you’re changing bits or switching profiles, allow an extra 10 minutes to verify your alignment with a square before you begin cutting.
Is it safe to route without a fence?
No, you should never route without a fence or a template guide. The fence provides the lateral support necessary to keep the wood from being pulled into the bit uncontrollably. Always use a fence or a bearing-guided bit to maintain consistent contact and safe operation.
What happens if I move the wood too fast?
Moving the wood too fast causes the bit to “chatter” or skip, leaving uneven ridges on the surface of your project. This happens because the cutter doesn’t have enough time to remove the material properly. Use a consistent, moderate pace to ensure a smooth finish.
How often should I sharpen my router bits?
You should replace or send your router bits to a professional sharpening service whenever you notice them burning the wood or requiring more force to feed.
How do I stop the wood from lifting?
Use featherboards mounted to your fence and table to prevent wood from lifting. These tools provide constant downward and lateral pressure, keeping your stock securely against the table surface throughout the entire cut. This setup effectively eliminates vibrations that could otherwise cause the wood to jump and ruin your work.
Conclusion
Practice these techniques on some scrap wood before you start your main project. You’ll find that getting a feel for the resistance helps you gain confidence with every pass. Don’t rush the process, and you’ll soon create professional results that you’re truly proud to show off in your home.