How to Use a Track Saw: Setup and Straight Cut Guide
A track saw setup involves aligning a circular saw along a rigid guide rail to achieve straight, splinter-free cuts that are often impossible with a standard table saw. By locking the saw into a track, you eliminate lateral movement to perform your first cuts on large sheet goods or finish-quality crosscuts with ease. Mastering this tool requires an understanding of rail positioning, depth adjustment, and the specific mechanics of the plunge action.
Key Takeaways
- Always verify the splinter guard is properly trimmed before making your first official cut to ensure zero-clearance accuracy.
- Use a vacuum extraction system to keep the track channel clear of debris, which prevents the saw from drifting during the cut.
- Check the squareness of your blade to the track using a precision machinist square before every high-stakes project.
- Prioritize safety by wearing ANSI-certified eye protection and hearing protection whenever the motor is engaged.
- Ensure your workpiece is fully supported on both sides of the cut to prevent binding and dangerous kickback.
Steps to Setup Your Track Saw for Straight Cuts
Setting up your track saw properly is the most critical step for achieving accuracy. Start by placing the track on your workpiece and aligning the edge of the rubber splinter guard with your pencil mark. If you’re using a new track, you must perform a “zero-clearance” cut to trim the rubber strip to the exact width of your blade.
Pro Tip: Always place your track on the “keep” side of your cut line. Because the blade removes a small amount of material—the kerf—placing the track on the wrong side will leave your piece undersized.
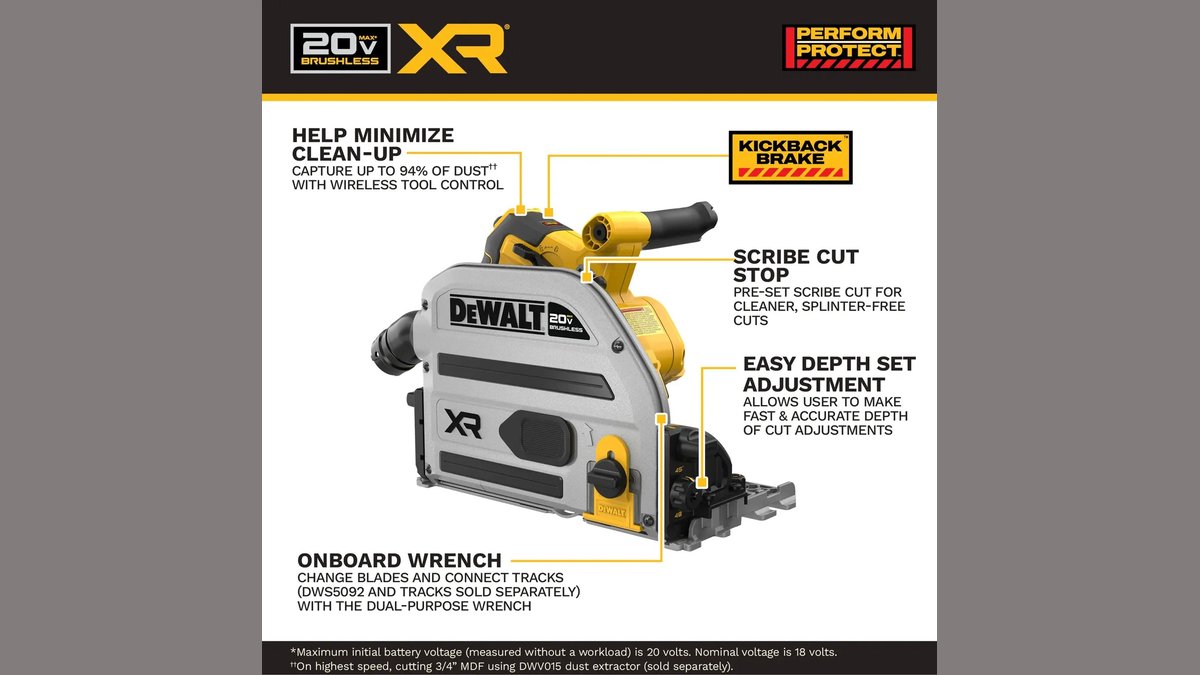
Essential Components
| Component | Function | Maintenance Requirement |
|---|---|---|
| Guide Rail | Provides a rigid path | Keep clean of dust |
| Splinter Guard | Prevents tear-out | Replace when worn |
| Plunge Mechanism | Safely starts mid-board | Lubricate moving parts |
| Depth Stop | Controls blade protrusion | Verify with calipers |
Achieving Straight Cuts with Precision
To achieve perfectly straight cuts, you must manage the tension and stability of the track. If the track isn’t secured, it can shift during the cut, leading to wavy edges. Use specialized track clamps that slide into the underside of the rail to lock it firmly against the material.
When cutting, maintain consistent downward pressure on the saw and push it forward with a steady, moderate pace. Avoid forcing the saw, as this can cause the blade to deflect or the motor to bog down.
Troubleshooting Alignment Issues
- Drifting: Often caused by a dull blade; replace with a high-quality carbide-tipped blade.
- Binding: Occurs when the rail isn’t perfectly parallel to the cut line; realign and re-clamp.
- Chatter: Usually the result of a loose saw-to-track fit; adjust the eccentric cams on the saw base.
Mastering Your First Cuts
Before attempting your first complex project, practice on a scrap piece of plywood or MDF. Start by setting your blade depth to exactly 1/8 inch deeper than the thickness of the material.
- Place the track on your scrap material.
- Connect your dust extraction hose to the port.
- Plunge the saw into the material.
- Push the saw forward at a steady speed.
- Release the trigger and let the blade stop completely before lifting the saw.
Why Use a Track Saw?

A track saw offers unique advantages over traditional tools. It’s highly portable, meaning you can bring the tool to the material rather than moving large, heavy sheets of plywood onto a table saw. The enclosed blade design also makes it significantly safer and cleaner when paired with a shop vacuum.
Comparison of Cutting Methods
| Method | Portability | Precision | Ideal Use Case |
|---|---|---|---|
| Track Saw | High | Excellent | Large sheet breakdown |
| Table Saw | Low | Excellent | Rip cuts, mass production |
| Circular Saw | High | Low | Rough framing, demo |
Proper Blade Selection
The type of blade you install dictates the quality of the finish. For clean, splinter-free cuts in hardwood veneers or melamine, use a fine-tooth blade with a high tooth count, typically 48 to 60 teeth for a 6-1/2 inch blade. For general construction lumber or breaking down raw plywood, a 24-tooth blade is sufficient and will cut much faster.
Warning: Never use a blade that isn’t rated for the maximum RPM of your track saw, as this can lead to catastrophic blade failure during operation.
Maintaining Your Equipment
Regular maintenance extends the life of your saw and ensures consistent performance. Wipe down the guide rails with a dry cloth after every use to prevent dust buildup. Check the tension of the saw on the rail periodically; if the saw rocks back and forth, the adjustment cams are too loose.
- Clean the motor vents with compressed air.
- Check the power cord for any fraying.
- Inspect the rubber strip on the bottom of the track for peeling.
Safety Protocols for Users
Operating a track saw requires focus and the right environment. Never stand directly behind the saw during the cut, as kickback can occur if the blade binds. Always use a stable workbench or sacrificial foam board underneath your material to support the off-cut piece.
- Wear impact-resistant goggles.
- Use ear muffs or plugs.
- Keep your workspace clear of trip hazards.
- Ensure the work area is well-lit.
Frequently Asked Questions
Can I use a track saw for bevel cuts?
Yes, most track saws are designed to tilt up to 45 or 48 degrees. Simply loosen the bevel adjustment knob on the saw, set your desired angle using the integrated scale, and lock it into place. Ensure you account for the change in effective blade depth when cutting at an angle, as the blade will need to be plunged deeper to cut through the same material thickness.
Do I need a specific vacuum for dust collection?
While any shop vacuum works, a vacuum with a HEPA filter is highly recommended to capture fine wood dust. Some manufacturers offer Bluetooth-enabled vacuums that start automatically when the saw is triggered, which significantly reduces airborne particles. Using a vacuum is essential not just for cleanliness, but also for maintaining the track’s grip on the material surface by removing dust from the path.
How do I join two tracks together?
To join tracks, use dedicated connector bars that slide into the T-slots on the underside of the rails. Tighten the set screws on the connectors to ensure the rails are perfectly aligned. It’s a good practice to use a long precision straightedge across the joint to verify that the tracks are perfectly flush and straight before tightening the final fasteners.
Can a track saw replace a table saw?
For many woodworkers, a track saw can replace a table saw for breaking down sheet goods. However, a table saw remains superior for repetitive, small-part production where jigs and fences are required. If you primarily build furniture from large sheets, a track saw is often more efficient, but it lacks the capability for dadoes or complex joinery setups that a table saw provides.
How often should I replace the splinter guard?
Replace the splinter guard whenever it becomes frayed or if you switch to a blade with a different kerf width. Because the guard acts as a zero-clearance insert, it must be trimmed every time you change blades to maintain its effectiveness. Keeping a spare roll of adhesive-backed splinter guard tape in your shop is a smart way to ensure you’re never stuck mid-project.
Conclusion
Taking the time to calibrate your rail and master the plunge motion will transform your woodworking results. Start by practicing on scrap material until you feel comfortable with the feed rate and the feel of the saw sliding along the track. Once you have built your confidence, your first project will be significantly cleaner and more accurate than ever before.